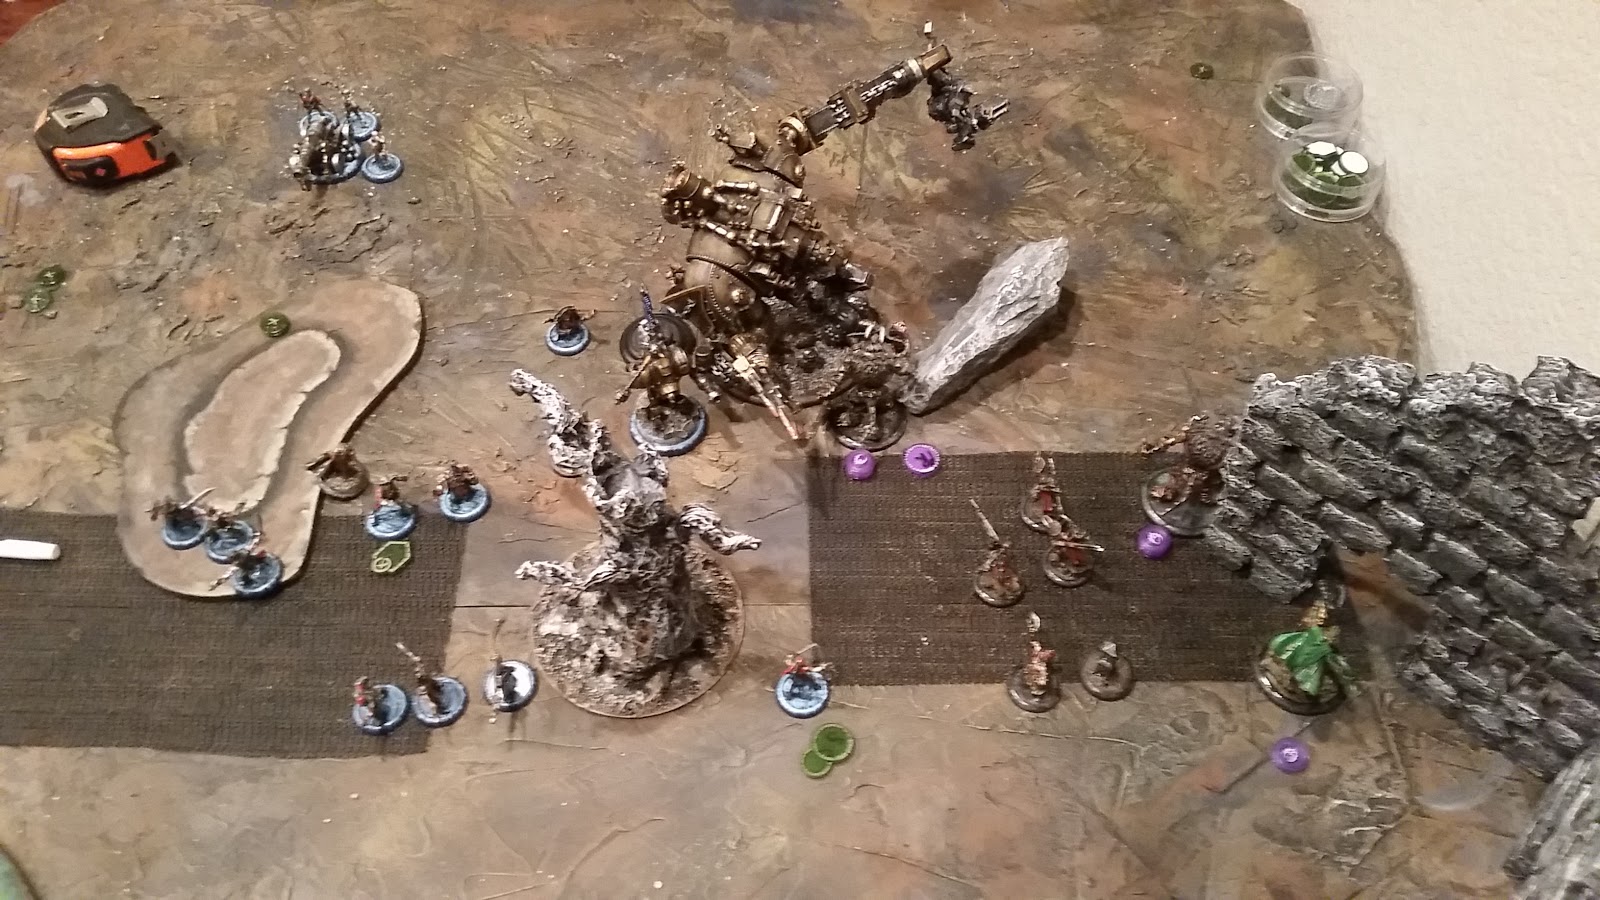
This was an interesting match up. I really wanted to get back into Shae's A Pirate's Life theme list again since it's fun and unique. The match up today is Shae vs. eMorvahna.
Mercenaries List: Phinneus Shae, Galleon, Press Gangers, Sea Dog Boarding Crew + 1 Weapon Attachment + UA Mr. Walls, Lady Aiyana & Master Holt, Dirty Meg Jack Mashalling a Mule, Doc Killingsworth, Bosun Grogspar, First Mate Hawk, Lord Rockbottom, and my favorite: The Commodore Cannon.
Circle Orbors List: eMorvahna, Druid Wilder, Ghetorix, Warpwolf Stalker, Gorax, Bloodtrackers + Nuala, Warpwolf Skinwalkers + Alpha UA, Lord of the Feast, and Shifting Stones + UA.
Staring Deployment
I've been trying to figure out the math for Pirates and decided to go 2nd with them. They have such a long threat range with all their movement tricks that they're highly likely to get the alpha strike.
Circle deploys with the Bloodtrackers to the right of the field and Prey on the Sea Dog Boarding Crew. He also sets up Ghetorix and the Stalker towards the right to try and take care of the Galleon.
I wanted to try out a different deployment with the Pirates and I spread out the Commodore Cannon and the Galleon so I could control both of the zones with long ranged shots. I kept the Sea Dog Boarding Crew more centralized with the super Pirate support staff behind them.
Circle Top of Turn 1
Circle runs up and spreads out a bit. eMorvhana stays in the middle while the army splits in two. The left side is controlled by the Warpwolf Skinwalkers, UA, and Lord of the Feast while the other side has Bloodtrackers, Stalker, Ghetorix, and Stones with UA.
Mercenaries Bottom of Turn 1
On my turn I activate Shae first and pop feat. This gave me 3" to position everything except the Galleon and some Press Gangers on the fringe. I also cast Storm Rager on First Mate Hawk. The Feat gave me a good charge against the Lord of the Feast which the unboosted Sea Dog Boarding Crew were able to handle with a good charge(I forgot to activate Lord Rockbottom first to get extra melee attack dice but it worked out) They also took care of 1 Blood Tracker.
The Press Gangers at the top spread out a bit. You can see that I try to hide one behind the ruins so that Circle would have a tough time trying to control the zone. The rest move charge in and take out 2 Bloodtrackers.
The Commodore Cannon blasts a cannon ball at a Skinwalker and does 5 damage. The collateral damage also knocks down the Skinwalker next to him and does 6 damage.
The Mule jackmarshalled by Dirty Meg moves up and does nothing.
The rest of the Pirate support staff (Lord Rockbottom, Grogspar, Killingsworth, First Mate Hawk) set up to give their Tough, No Knockdown, and +4 Knockdown to the Sea Dog Boarding Crew.
The Gallon missed a shot vs. Ghetorix because he was too far but was able to use his AOE Rapid fire shots (4 total) and killed 5 Blood trackers with AOEs which worked out great.
Circle Top of Turn 2
Morvahna 2 upkeeps Carnivore on the Skinwalkers and they activate. Two are knocked down so they give up their action to stand and just move. The rest of the Skinwalkers are able to kill off 3 Sea Dog Boarding crew guys with charges. The Alpha stays back and toes the zone hoping to stay alive.
The Bloodtrackers activate and clear up some of the Press Gangers and Sea Dog Boarding Crews at their right flank. The Stone Keeper and Stones activate next and try to Rock Hammer a group of Press Gangers behind the ruins but only manage to kill 1.
This left a lane for the Warpwolf Stalker to charge in and Berserker into 5 Press Gangers. He needs 7's to hit and is able kill one but when the Berserk triggers, the Press Ganger toughs. This goes on for 5 hits with Tough and needing 7's to hit being major roadblocks for the Stalker. It would have been a better idea to swap over the Carnivore +2 MAT to the Stalker. He would have be able to wipe out the Press Gangers instead of leaving 3 alive.
eMorvahna then activates and decides to feat and brings back 7 Bloodtrackers. I think saving it for the Skinwalkers would have been much better but Circle needed a way to block the Drag shot from the Galleon to Ghetorix. She then casts Fog of War and camps 3.
Ghetorix moves into place and gets ready to charge the Galleon.
Mercenaries Bottom of Turn 2
My goal for Turn 2 was to dominate the right zone. It didn't seem like a huge problem with the tools I had on that side of the field.
I was really excited to get some Commodore Cannon action going so I activated them first. I probably should have debuffed them with Kiss of Lyliss before I shot though. The Commodore shot the Skinwalker with RAT 8 and blasted him back 4" which knocked down the Alpha. The shot killed the Skinwalker hit and did a good chunk of damage to the UA.
Aiyana and Holt activate next and Aiyana successfully casts Kiss of Lyliss on a Warpwolf Skinwalker that is out of eMorvahna's Fog of War range. I should have just targeted the knocked down Alpha, duh.
The Sea Dog Boarding Crew activate next and do some charging. I screw up again and forget that First Mate Hawk gives them Weapon Master vs. Warrior models. They are able to kill everything except they leave 1 Skinwalker on 4 boxes which would have been dead if I remembered the rule.
Since I didn't clear the zone, I didn't have to run Shae into it so I just moved him within walking distance of it next turn.
The Mule does nothing again. I really need another unit of Press Gangers.
The Galleon activates next and moves up to walking distance of the left zone. He gets 4 Rapid Fire shots again and with AOEs he is able to kill 5 Bloodtrackers. His last shot with his Trident is boosted and smashes a Bloodtracker that is within 5" of him
Lord Rockbottom gets aggressive and aims for a spray shot. He is able to kill the Stone Keeper and removes the teleportation threat off the table.
Circle Top of Turn 3
No points have been scored yet due to some bad dice and bad strategic play on both sides. eMorvahna lets Carnivore drop on the one Skinwalker and moves into kill some Press Gangers behind the ruins. This also gets her away from the Galleon but keeps her in the zone to Dominate. The Skinwalker activates and with some bad dice and tough are only able to kill 1 of the 2 Press Gangers contesting the zone.
The Bloodtrackers clear a path for Ghetorix by moving out of the way and putting all their Weapon Master ranged shots into Bosun Grogspar that is contesting the zone. They are able to kill him after a couple Tough checks. The Stones without their UA also get out of the way of Ghetorix.
The Druid Wilder users her special action and casts the Primal Animus on Ghetorix. Ghetorix then charges in with MAT 9 - POW 21s against the Galleon's ARM 19. On Average dice he should do about 39-43 damage on the Galleon but only does 37 which takes out his Left side.
The Gorax has nothing left to do and moves into the right zone and hopes to survive.
Mercenaries Bottom of Turn 3
The game is pretty much mine because Circle failed to score on their turn. I just need to keep Shae safe. Even if Cirlce were able to Dominate for 2 I think my Pirates would have had enough tools to defend the Objective and contest for a scenario win. Circle was pretty wiped out by now.
Shae gives 3 Focus to the Galleon and camps 2. Aiyana and Holt activate and get Kiss on the Gorax and the Sea Dog Boarding Crew finish him off. Phinneus Shae handles the last Skinwalker and Dominates the zone.
The Galleon activates, moves in a little closer and boosts to hit Ghetorix. After spending all his focus he leaves Ghetorix on 6 boxes.
Dirty Meg runs toward the Galleon hoping to repair him next turn. The Mule follows her and sets up to contest the zone next turn.
The Commodore Cannon is too slow and too far way to do anything. I definitely need to centralize it more next time I play this list.
Mercenaries score 2 Points
Circle Top of Turn 4
Ghetorix frenzies because of Primal and does 11 damage to the Galleon. The Galleon still has all systems functioning for his right side. Circle has to contest or lose the game so they run a Bloodtracker into the zone. Another Bloodtracker tries to charge First Mate Hawk but fails to hit needing 9s.
The Stalker is faced the wrong way and has a Giant rock separating him from the Galleon so he just runs towards the edge of his zone to protect it from being contested.
Score: Mercenaries 2 - Circle 0
Mercenaries Bottom of Turn 4
The game is mine if I can complete 2 simple tasks. 1 - Kill the Bunker Objective. 2 - Kill a Bloodtracker. If I can do these things I will Dominate the zone again and get a point for destroying my opponent's objective.
I decide to play out all my pieces just for practice. The Galleon with 3 Focus is able to take out Ghetorix, Rockbottom sprays and takes out a Stone, and the Mule charges the Stalker and misses. Woo hoo.
Shae then activates, boosts to hit and annihilates the Bloodtracker. Three Sea Dog Boarding Crew members charge into the objective with POW 10 boosted attacks. I was able to do just enough damage to kill it. In retrospect that was a bad idea because the average damage would be around 6 and I need 15 damage to an ARM 18 to kill.
I didn't realize it but I could also Kiss of Lylss the objective since it's a model. I could have also shot it with Holt and pull back Hawk to hit it with 2x POW 9 Weapon Masters giving me a better chance to destroy the objective. Either way, I got lucky and took it out and Mercenaries won the game with 5 victory points.
Summary
Pirates are tricky because of all the synergy involved. They've got a Charge distance buff from Shae along with his feat of allowing them to move 3", they have Lord Rockbottom's coins which either give them Tough, +2 RAT +2 Ranged damage, or boosted melee attack dice, First Mate Hawk's +1 additional die vs. warrior models, Grogspar's no knockdown, Killingsworth's +4 tough, and they have Mr. Wall's +2 Movement + Pathfinder mini feat.
Trying to get everything to line up is pretty tough on model placement. You've also got the Press Gangers which benefit from the same thing but usually there's not enough room for everyone to get the goodies.
A Pirate's Life theme list struggles with ARM skews a lot but is great vs. lots of warrior models. The next time I play this list I plan to centralize the Commodore Cannon more and I'd probably swap out the Mule for 10 Press Ganges and 2 Sea Dog Weapon Attachments. It does mean I'd have to purchase more Press Gangers but people are now starting to play them in Butcher 3 which might be fun for me.
I could swap out the Mule which threatens 12" with a Mariner which threatens 20" (15 Range + 5 Move) and get more work out of it but that means Dirty Meg will have to ditch the Galleon and exclusively be tethered to the Mariner. I also lose 1 POW and 1" of AOE. A boosted RAT 5-7 at POW 14 - AOE 3 - with a 15-20" threat range could do way more work than a boosted RAT 7 POW 15 - AOE 4 - with a 12" threat.
Over all, I like this list because I haven't seen many people play it and a lot of people won't know how to handle it. I will practice it a bit more and get the threat ranges down in my next blog post.